From Scratch: How to create a simple database frontend with ASP.NET Core (Part 2)
by James Earnshaw on June 22, 2024
This is a series where I create a simple web frontend for a SQL Server database.
In part 1 I created a basic MVC web application using ASP.NET Core. The aim in part 2 is to create the page that will display data from a SQL table. I start by creating the database and demo data in SQL Server. Then I add packages to work with Entity Framework Core, the ORM I use for creating model classes from SQL tables. The remaining steps are about configuring the application to use SQL Server via Entity Framework Core. Finally I add the page that renders a table with data from a SQL table.
By the end you'll probably agree that the seemingly simple task of getting SQL data to display in a web page is not so straightforward.
Planetary Data
The frontend will display data from an astronomy themed database called SolarSystem. It has a planet table storing a few facts about planets I obtained from here. Open SSMS and connect to your LocalDB instance. The server name will be (localdb)\MSSQLLocalDb. The following script creates the database, the table, and inserts data into the table:
CREATE DATABASE SolarSystem
GO
USE SolarSystem
GO
DROP TABLE IF EXISTS dbo.planet
GO
CREATE TABLE dbo.planet
(
    planet_id int identity(1,1) not null
        primary key clustered,
    [name] nvarchar(100) not null,
    mass decimal(10,3), /*(10^24kg)*/
    moons smallint,
    has_ring_system bit
)
INSERT INTO dbo.planet
(
    [name],
    mass,
    moons,
    has_ring_system
)
VALUES
('Mercury',0.33,0,0),
('Venus',4.87,0,0),
('Earth',5.97,1,0),
('Mars',0.642,2,0),
('Jupiter',1898,95,1),
('Saturn',568,146,1),
('Uranus',86.8,28,1),
('Neptune',102,16,1),
('Pluto',0.013,5,0) /*Pluto is now classified as a dwarf planet but is included anyway.*/
GO
Import the packages
Real world projects use code written by other people that comes in the form of libraries, modules, packages, and frameworks (like ASP.NET Core). It's a way of reusing code and not reinventing the wheel. It means you can import the functionality you need and focus on developing the core logic of your application. Added benefits include the code being (usually) well-tested, reliable, and documented.
You'd never get anything done if you tried writing everything from scratch, like your own ORM tool, for example. Plus your attempt would be terrible. You'd just wish you could use an ORM created by professionals that works.
Well you can and that's what this step is doing. When developing in .NET third party code comes bundled in NuGet packages. NuGet is a package manager, a tool for sharing code. NuGet packages are added to projects with the command dotnet add package. The packages needed for this tutorial are the Entity Framework Core packages. As mentioned in part 1 Entity Framework Core is an ORM tool that simplifies the communication between model classes and the database. Run these commands to import three Entity Framework Core packages:
cd C:\work\WebUI
dotnet add package Microsoft.EntityFrameworkCore.Design -v 8.0.0
dotnet add package Microsoft.EntityFrameworkCore.SqlServer -v 8.0.0
dotnet add package Microsoft.EntityFrameworkCore.Tools -v 8.0.0
Entity Framework Core classes can now be used in the project.
Create the DbContext
A technique called scaffolding is used to create classes from an existing database schema, i.e., the planet table. To use the scaffolding command you need to have the Entity Framework Core CLI tools installed. Do that with:
dotnet tool install --global dotnet-ef
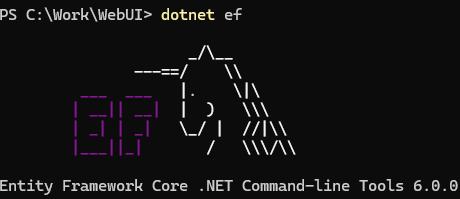
Verify that it's installed with dotnet ef. The output will be the following (yes, it's a unicorn):

Scaffolding
The scaffolding command requires a database connection string. Assuming you've installed SQL Server Express LocalDB, the connection string required by the scaffolding command is:
Server=(localdb)\MSSQLLocalDB;Integrated Security=true;AttachDbFileName=C:\Users\<user>\SolarSystem.mdf
AttachDbFilename is the path to the .mdf file of the SolarSystem LocalDB database. By default it's in the user's folder, so change <user> accordingly. Run the following:
cd C:\work\WebUI
dotnet ef dbcontext scaffold "Server=(localdb)\MSSQLLocalDB;Integrated Security=true;AttachDbFileName=C:\Users\<user>\SolarSystem.mdf" Microsoft.EntityFrameworkCore.SqlServer `
--table dbo.planet --output-dir Models
This creates the classes SolarSystemContext and Planet in the Models folder:

SolarSystemContext, which derives from the base DbContext class, is called a database context. A DbContext represents a connection to a database and it's through a context object that SQL commands are executed. It also contains the mapping between the model class, Planet, and the database table of the same name dbo.planet.
Notice how the scaffolding renamed the column names, which are in snake_case in SQL, in PascalCase. E.g. planet_id became PlanetId. It's because .NET uses Pascal case by convention so it's about being consistent. The same is true for the table dbo.planet, which became the Planet class.
Add the connection string
In appsettings.json add the connection string SolarSystemConnection:
{
  "Logging": {
    "LogLevel": {
      "Default": "Information",
      "Microsoft.AspNetCore": "Warning"
    }
  },
  "AllowedHosts": "*",
  "ConnectionStrings": {
    "SolarSystemConnection": "Server=(localdb)\\MSSQLLocalDB;Database=SolarSystem;MultipleActiveResultSets=True"
  }
}
Register the DbContext
The database context class SolarSystemContext needs to be registered so that it can be used throughout the application. This is a technique more formally known as dependency injection. These kinds of setup and configuration tasks are always done in the Program.cs file. Add the below statement somewhere between the statements var builder = WebApplication.CreateBuilder(args); and var app = builder.Build();:
using Microsoft.EntityFrameworkCore;
using WebUI.Models;

var builder = WebApplication.CreateBuilder(args);

// MVC service
builder.Services.AddControllersWithViews();

// registering the DbContext
builder.Services.AddDbContext<SolarSystemContext>(options => options.UseSqlServer(builder.Configuration
                    .GetConnectionString("SolarSystemConnection"))
    );

var app = builder.Build();

// MVC middleware
app.MapDefaultControllerRoute();

app.Run();
Also don't forget the two using statements at the top.
So now when the application starts up the SolarSystemContext will be available from anywhere in the app, which we make use of in the controller.
Add the context to the controller
In the MVC pattern , as used in ASP.NET Core, requests are routed to controller actions. Actions, in this context, are methods in controller classes, e.g. the Index() method in the HomeController class. So a request for localhost:5000/home/index will be routed to the Index() action of the HomeController. You can actually dop the /index because it will look for Index() by default when a page isn't specified in the route.
Controllers handle requests by using the model to prepare the view that will be returned. The model refers to the set of classes that represent the domain, i.e., the Planet class. For example, a request for the page that will display the planet data needs a view with planet data. So the controller must return a view with a model containing planet data.
Views contain markup that will be rendered into HTML by the Razor view engine, and then sent back to the client for the user to see.
So with that in mind I modify the file Controllers/HomeController.cs to look like this:
using Microsoft.AspNetCore.Mvc;
using WebUI.Models;

namespace WebUI.Controllers
{
    public class HomeController : Controller
    {
        private SolarSystemContext _context;

        public HomeController(SolarSystemContext context)
        {
            _context = context;
        }

        public IActionResult Index()
        {
            return View(_context.Planets);
        }
    }
}
There are three changes. The first is the private property _context, which is a SolarSytemContext. The second change sets the value of the private _context through the constructor. This is dependency injection in action, specifically constructor injection. So at runtime the controller will have access to the database context. The third change is to the View() method returned by the Index() method (or action). View() accepts a model parameter that I've set to the Planets property of the SolarSystemContext class. Planets was created by the scaffolding and it's a DbSet<Planet> type. The view will use this model to render a page displaying the planet data.
Create the view
The final part is to modify the Views/Home/Index.cshtml file by adding the markup for displaying the data. Set the contents of the file to the following:
@using WebUI.Models
@model IQueryable<Planet>

<div>
    <h1>Planets</h1>

    <table>
        <thead>
            <tr>
                <th>Name</th>
                <th>Mass</th>
                <th>Diameter (km)</th>
                <th>Gravity</th>
                <th>Day length (hrs)</th>
                <th>Distance from Sun</th>
                <th>Orbital days</th>
                <th>Mean temperature (C)</th>
                <th>Moons</th>
                <th>Has ring system</th>
            </tr>
        </thead>
        <tbody>
            @foreach (Planet p in Model)
            {
                <tr>
                    <td>@p.Name</td>
                    <td>@p.Mass</td>
                    <td>@p.DiameterKm</td>
                    <td>@p.Gravity</td>
                    <td>@p.DayLengthHours</td>
                    <td>@p.DistanceFromSun</td>
                    <td>@p.OrbitalDays</td>
                    <td>@p.MeanTemperature</td>
                    <td>@p.Moons</td>
                    <td>@p.HasRingSystem</td>
                </tr>
            }
        </tbody>
    </table>
</div>
As this is a Razor view (.cshtml) it mixes HTML and C#. The first line includes the WebUI.Models namespace and the second line sets the model for the page, a collection of Planet objects, IQueryable<Planet>. This means that the properties of the model object can be used in the page. There is a HTML table in which the rows are generated using C#. The @foreach loops over the model (IQueryable<Planet>) to generate table rows.
Run the application
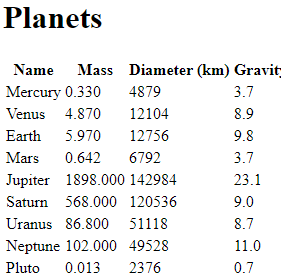
Now run the application and go to http://localhost:5000/Home. The data should be displayed in the page, like this:

End of part 2
At this point I've created a basic web application using the MVC framework with ASP.NET Core. You'll agree it doesn't look very good. But this will be addressed in Part 3 where I'll add CSS styling to make the application look more appealing.