From Scratch: How to create a simple database frontend with ASP.NET Core (Part 3)
by James Earnshaw on July 21, 2024
This is a series where I create a simple web frontend for a SQL Server database.
In parts 1 and 2 I created a basic MVC application using ASP.NET Core. In this post (part 3) I add styling with Bootstrap to improve the look.
LibMan to get client-side libraries
Bootstrap is a CSS framework that simplifies the styling of a website with professional looking widgets. The application needs a way of including client side libraries like Bootstrap. This is done through Library Manager (LibMan), a tool that downloads libraries from content delivery networks like CDNJS into the Visual Studio project.
Install LibMan with the following command. Get the most up to date version from NuGet. Remember to set the current location to the project root.
cd C:\work\WebUI
dotnet tool install --global Microsoft.Web.LibraryManager.Cli --version 2.1.175
Initialize LibMan in the project with:
libman init -p cdnjs
The -p option sets the default provider, in this case it's CDNJS. The init command creates a libman.json file in the root.
Installing Bootstrap is just a case of running the install command:
libman install bootstrap -d wwwroot/lib/bootstrap
The -d option is the destination. wwwroot is the conventional location for static files, like .css, and .js files. And lib because it's a folder for libraries, like Bootstrap.
Solution Explorer should look like this:
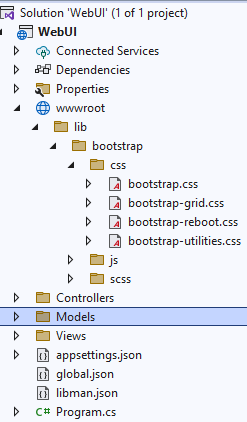
Notice the wwwroot folder has been added with the bootstrap files. For the app to be able to use the static files add the following line to Program.cs somewhere towards the bottom, but above app.Run():
// other lines not listed for brevity

app.UseStaticFiles();

app.Run();
This is just one of the many steps that configure middleware.
Add supporting views
Bootstrap is now available to use as a static resource in the wwwroot folder, but it's not being used in the Index.cshtml view so the page still looks the same. In a HTML document CSS files are included in the header with a <link> element. For example
<link href="/lib/bootstrap/css/bootstrap.min.css" rel="stylesheet" />
You could just place this line somewhere at the top of the Index.cshtml file and it would work. But you'd have to do that in every view you create. A better way is to use layout views. They're like templates that contain reusable elements like a main header or side navigation menu. To use layouts we need to add two new views to the Views folder: a layout view and a view start view.
_Layout.cshtml
Create a folder in the Views folder called Shared. Right click the Shared folder and Add > New item:
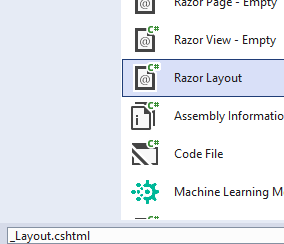
Add a Razor Layout called _Layout.cshtml. It contains some standard boilerplate HTML and razor markup @RenderBody(). The latter specifies the region where child views are rendered.
Add the Bootstrap <link> element. The file should look like this:
<!DOCTYPE html>

<html>
<head>
    <meta name="viewport" content="width=device-width" />
    <link href="/lib/bootstrap/css/bootstrap.min.css" rel="stylesheet" />
    <title>@ViewBag.Title</title>
</head>
<body>
    <div>
        @RenderBody()
    </div>
</body>
</html>
Now we have a layout that defines the basic structure of every view. It's not a very interesting layout; it's just a <div>. What's important to us is having Bootstrap available to add styles in every view. So we have a layout but it's not actually being used in the views. The next step enables this behaviour.
_ViewStart.cshtml
_Layout.cshtml defines the template and _ViewStart.cshtml ensures the template gets used in every view. Without a _ViewStart.cshtml you'd have to define a layout in every view, which is unnecessary. Right click the Views folder and click Add > New item. Add a Razor View Start called _ViewStart.cshtml:
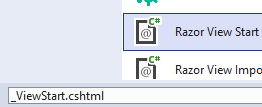
By default the file looks like this:
@{
    Layout = "_Layout";
}
No further changes are needed. The Views folder in Solution Explorer should look like this:
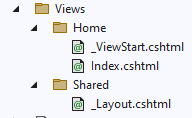
With this now setup, views are rendered as children in the _Layout.chstml file. Crucially it has the Bootstrap <link> resulting in Bootstrap being used in every view in the application.
Using Bootstrap to style the table
Now it's time to style the table. It's not in the scope to explain how Bootstrap works but the basics are simple enough. An element is styled through its class attribute. Bootstrap defines what values go into a class, e.g., class="table" styles a <table> element.
Style the table with class="table table-striped" and the outer div with class="container-sm" (a small container):
<div class="container-sm">
    <h1>Planets</h1>

    <table class="table table-striped">
        <thead>
            <tr>
                <th>Name</th>
                <th>Mass</th>
                <th>Diameter (km)</th>
                <th>Gravity</th>
                <th>Day length (hrs)</th>
                <th>Distance from Sun</th>
                <th>Orbital days</th>
                <th>Mean temperature (C)</th>
                <th>Moons</th>
                <th>Has ring system</th>
            </tr>
        </thead>
        <tbody>
            @foreach (Planet p in Model)
            {
                <tr>
                    <td>@p.Name</td>
                    <td>@p.Mass</td>
                    <td>@p.DiameterKm</td>
                    <td>@p.Gravity</td>
                    <td>@p.DayLengthHours</td>
                    <td>@p.DistanceFromSun</td>
                    <td>@p.OrbitalDays</td>
                    <td>@p.MeanTemperature</td>
                    <td>@p.Moons</td>
                    <td>@p.HasRingSystem</td>
                </tr>
            }
        </tbody>
    </table>
</div>
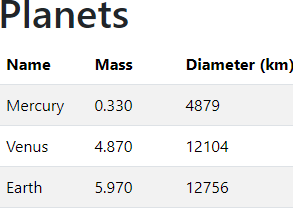
Run the application and see how much better the table looks with Bootstrap styles:
End of Part 3
We built on the work so far by adding styles to the table making it look more appealing. In part 4 I'll add some CRUD pages.