From Scratch: How to create a simple database frontend with ASP.NET Core (Part 4)
by James Earnshaw on September 05, 2024
This is a series where I create a simple web frontend for a SQL Server database. See the other parts:
So far I've created a web app in ASP.NET Core that displays data from a SQL table in a web page. In this post I add the ability to perform the classic database operations create, read, update, and delete (aka CRUD) on the planet data.
I start by adding a view model and then a view that uses the view model as its page model. This means I can use one view and adapt it for the four operations. Then I add the four actions (C# methods) to the controller. Lastly I modify the existing Index.cshtml home page by adding the buttons that let user do one of the database operations.
Adding a view model
A view model is a C# class that is an abstraction over a view. The view model's properties are bound to (visual) elements in the view. Instead of having four views (one for each CRUD operation) I just have one view and set its page model as the view model. The view model can be adapted at load time depending on the request. This reduces the amount of code and files.
Add a ViewModels folder to the Models folder. Add a class file called ViewModel.cs and set its contents to this:
namespace WebUI.Models.ViewModels
{
    public class ViewModel
    {
        public IEnumerable<Planet> Planets { get; set; }
             = Enumerable.Empty<Planet>();
        public Planet? Planet { get; set; }

        public string Action = "Create";
        public string Button
        {
            get { return (Action == "Edit")
                 ? "Save" : Action; }
        }
    }
}
Add context methods for the CRUD operations
In the SolarSystemContext.cs file add these methods:
public void Create(Planet planet)
{
    Planets.Add(planet);
    SaveChanges();
}
public void Update(Planet planet)
{
    Planets.Update(planet);
    SaveChanges();
}
public void Delete(Planet planet)
{
    Planets.Remove(planet);
    SaveChanges();
}
These are wrappers around Entity Framework Core methods that handle database changes. They are called from the controller actions, which I add next.
Add the CRUD actions
Set the contents of the HomeController.cs file to the following. There are 7 new methods, one for reading (C) a planet, and GET/POST pairs for the 3 other database operations (RUD). The GET version of the method takes the user to the CRUD page (adding next) and the POST version of the method instructs the application to persist the requested changes to the database.
using Microsoft.AspNetCore.Mvc;
using WebUI.Models;
using WebUI.Models.ViewModels;

namespace WebUI.Controllers
{
    public class HomeController : Controller
    {
        private SolarSystemContext _context;

        public HomeController(SolarSystemContext context)
        {
            _context = context;
        }

        public IActionResult Index()
        {
            return View(_context.Planets);
        }

        [Route("Planet/{name}")]
        public IActionResult Planet(string name)
        {
            var planet = _context.Planets
                .Where(p => p.Name == name)
                .First();
            var model = new ViewModel()
            {
                Planet = planet,
                Action = "Read"
            };
            return View("PlanetEditor", model);
        }

        #region Create
        [Route("CreatePlanet")]
        public IActionResult CreatePlanet()
        {
            var model = new ViewModel()
            {
                Planet = new Planet(),
                Action = "Create"
            };
            return View("PlanetEditor", model);
        }

        [HttpPost]
        public IActionResult CreatePlanetPost([FromForm] ViewModel model)
        {
            _context.Create(model.Planet);
            return RedirectToAction("Index");
        }
        #endregion

        #region Edit
        [Route("EditPlanet/{name}")]
        public IActionResult EditPlanet(string name)
        {
            var planet = _context.Planets
                .Where(n => n.Name == name)
                .First();
            var model = new ViewModel()
            {
                Planet = planet,
                Action = "Edit"
            };
            return View("PlanetEditor", model);
        }

        [HttpPost]
        public IActionResult EditPlanetPost([FromForm] ViewModel model)
        {
            _context.Update(model.Planet);
            return RedirectToAction("Index");
        }
        #endregion

        #region Delete
        [Route("DeletePlanet/{name}")]
        public IActionResult DeletePlanet(string name)
        {
            var planet = _context.Planets
                .Where(n => n.Name == name)
                .First();
            var model = new ViewModel()
            {
                Planet = planet,
                Action = "Delete"
            };
            return View("PlanetEditor", model);
        }

        [HttpPost]
        public IActionResult DeletePlanetPost([FromForm] ViewModel model)
        {
            _context.Delete(model.Planet);
            return RedirectToAction("Index");
        }
        #endregion
    }
}
Create a view for the CRUD operations
A view is needed as the interface where the user can choose the changes they want to make to a planet record, e.g. filling in blank fields for a new planet, updating the fields for an existing planet, or deleting the record entirely. Therefore the view needs to display either a blank form for the creation (C) of a new planet, or a form showing an existing planet's data for the user to either: see (i.e. read (R)), edit (U), or delete (D).
Add a view called PlanetEditor.cshtml to the Home folder. Despite the view's name containing "editor" it will be used for all four operations.
Set its contents to this:
@model ViewModel

<div class="container-sm my-4">
    @{
        switch (Model.Action)
        {
            case "Create":
                <h1>Create a new Planet</h1>
                break;
            case "Read":
                <h1>@Model.Planet.Name</h1>
                break;
            case "Edit":
                <h1>Edit planet @Model.Planet.Name</h1>
                break;
            case "Delete":
                <h1>Delete planet @Model.Planet.Name?</h1>
                break;
            default:
                <h1>N/A</h1>
                break;
        }
    }
    <form method="post" asp-action="@(Model.Action + "PlanetPost")">
        <input type="hidden" value="@Model.Planet.PlanetId"
        asp-for="Planet.PlanetId" />
        @if (Model.Action == "Create")
        {
            <div class="row mb-3">
                <label class="col-sm-2 form-label fw-bold"
                asp-for="Planet.Name">Name</label>
                <div class="col-sm-10">
                    <input class="form-control" type="text"
                    value="@Model.Planet.Name"
                    asp-for="Planet.Name" />
                </div>
            </div>
        }
        else
        {
            <input type="hidden" value="@Model.Planet.Name"
            asp-for="Planet.Name"/>
        }
        <div class="row mb-3">
            <label class="col-sm-2 form-label fw-bold"
            asp-for="Planet.Mass">Mass</label>
            <div class="col-sm-10">
                <input class="form-control" type="text"
                value="@Model.Planet.Mass" asp-for="Planet.Mass" />
            </div>
        </div>
        <div class="row mb-3">
            <label class="col-sm-2 form-label fw-bold"
            asp-for="Planet.Moons">Moons</label>
            <div class="col-sm-10">
                <input class="form-control" type="text"
                value="@Model.Planet.Moons"
                asp-for="Planet.Moons" />
            </div>
        </div>
        <div class="row mb-3">
            <label class="col-sm-2 form-label fw-bold"
                asp-for="Planet.HasRingSystem">
                Has ring system</label>
            <div class="col-sm-10">
                <input class="form-control"
                type="text"
                value="@Model.Planet.HasRingSystem"
                asp-for="Planet.HasRingSystem" />
            </div>
        </div>

        <div>
            @if (Model.Action != "Read")
            {
                <button type="submit" class="btn btn-info">
                @Model.Button
                </button>
            }
            <a class="btn btn-info" asp-action="Index">Cancel</a>
        </div>
    </form>
</div>
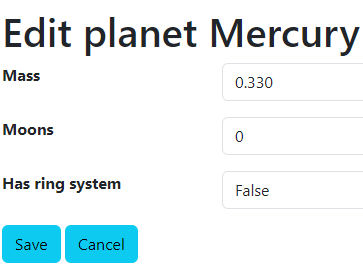
This page displays a form with fields that hold data for a planet's properties:

Add a view imports view
A _ViewImports.cshtml view is a way of including namespaces in all views so the declaration doesn't have to be written at the top of every file, thus making them look tidier.
Right click the Views folder and then Add > New item. Choose Razor View Imports and add a file called _ViewImports.cshtml.

Set its contents to this:
@using WebUI.Models
@using WebUI.Models.ViewModels
@addTagHelper *, Microsoft.AspNetCore.Mvc.TagHelpers
@addTagHelper *, WebUI
The top two @using lines include the WebUI.Models and WebUI.Models.ViewModels namespaces meaning I don't have to write @using WebUI.Models at the top of a view.
The @addTagHelper lines make tag helpers available to use. Tag helpers (a big topic) are a powerful feature that appear as extensions of HTML syntax in views, but use C# on the server to render HTML.
I use tag helpers in the PlanetEditor.cshtml file. Here's one example:
<form method="post" asp-action="@(Model.Action + "PlanetPost")">
The attribute asp-action is a form tag helper. The razor expression @(Model.Action + "PlanetPost") generates the action attribute value. The value depends on which CRUD operation was requested, for example, for "Edit" it renders:
<form method="post" action="/Home/EditPlanetPost">
It's basically making the form's action attribute dynamic. The above form will post to the EditPlanetPost action in the HomeController:
[HttpPost]
public IActionResult EditPlanetPost([FromForm] ViewModel model)
{
    _context.Update(model.Planet);
    return RedirectToAction("Index");
}
Which in turn will call the context class's Update method signalling for Entity Framework Core to step in and handles the database changes.
Add CRUD buttons to the home page
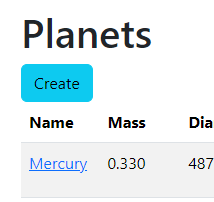
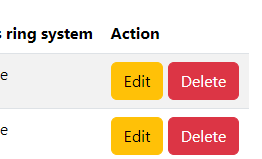
I add buttons for Create, Edit (instead of "Update", which I think makes more sense), and Delete. The Read operation is done by adding an anchor element (i.e. a hyperlink) on the planet's name. All three buttons, and the planet name hyperlink, take the user to the PlanetEditor.cs page with a HTML form where, in the case of create, update, and delete, they can post changes to the server and Entity Framework Core runs the necessary SQL statements (SELECT, INSERT, UPDATE, DELETE). The read operation isn't really "doing" anything apart from showing the user details about the record.
Modify the Views/Home/Index.cshtml file to look like the following:
@model IQueryable<Planet>

<div class="container-sm my-4">
    <h1>Planets</h1>
    <a class="btn btn-info" asp-action="CreatePlanet">Create</a>

    <table class="table table-striped">
        <thead>
            <tr>
                <th>Name</th>
                <th>Mass</th>
                <th>Moons</th>
                <th>Has ring system</th>
                <th>Action</th>
            </tr>
        </thead>
        <tbody>
            @foreach (Planet p in Model)
            {
                <tr>
                    <td><a asp-action="Planet"
                    asp-route-name="@p.Name">@p.Name</a></td>
                    <td>@p.Mass</td>
                    <td>@p.Moons</td>
                    <td>@p.HasRingSystem</td>
                    <td>
                        <a class="btn btn-warning"
                        asp-action="EditPlanet"
                        asp-route-name="@p.Name">Edit</a>
                        <a class="btn btn-danger"
                        asp-action="DeletePlanet"
                        asp-route-name="@p.Name">Delete</a>
                    </td>
                </tr>
            }
        </tbody>
    </table>
</div>
I made 4 changes:
- Added a create button (it's actually an anchor
<a>element styled as a button using Bootstrap:class="btn btn-info"). This is the C in CRUD. It links to a page for the creation of a new planet. - In the detail element (
<td>) of theNamecolumn I wrapped the planet name in an anchor element which will link to a page where that planet's information can be read (the R in CRUD). - Added an "Action" column at the end of the table (
<th>Action</th>). - Added two buttons (again anchor tags styled as buttons), one for Edit and one for Delete. These are the U and D in CRUD respectively.


End
And that's it. If you run the application with dotnet watch you should be able to make changes to the dbo.planet table through the application.
Note: I perhaps rushed this last part and didn't explain a lot of things. It's because of the wider scope: now the app needs to talk to a backend database, the amount of code and complexity has exploded. This could easily have been split into two or three more parts but I decided to get it out there.